Start free-motion quilting by following my simple steps will make it easy. I have listened to many speakers who make it sound incredibly complicated. As a beginner, an essential activity for you to master is setting up and practising sewing regularly.
The Foot
To start free-motion sewing, you will need a darning foot. The foot has a circular area where the needle will go through. Some feet will have part of the circle cutaway. These are called open-toed darning feet and allow you to see more of your sewing. Either foot will be perfect to use.
This foot, unlike all others, doesn’t hold the fabric in place when the presser foot is released down. Instead, it hovers above the material until the needle pierces the fabric and then releases it as soon as the needle comes back out. The material is only held for the moment as the needle enters and leaves the fabric. You can move the fabric in any direction between these little moments. The foot’s movement is a hopping motion, and the foot is often referred to as a hopping foot because of this.
Follow the manufacturer’s instructions to install the foot. Most darning feet will require the regular foot holder to be removed and the darning foot to be screwed directing into the shank. The Darning Foot has a prong at the top, which sits above the needle screw. This tiny prong stabilises the foot as it hops up and down in unison with the needle.

The Machine
In regular operation, the feed dogs, which come up out of the needle plate, move the fabric between stitches. The presser foot on the machine presses the material onto the feed-dog to facilitate this action. We will be moving the fabric and not the sewing machine for free-motion sewing, so the feed dogs are not required.
Traditionally the machine set up for free-motion sewing is to drop the feed dogs (lowering them below the needle plate) and set the stitch length to zero (which stops them moving). In fact, on all but a very few occasions when I am dealing with a very bulky quilt, I do neither of these things. The foot only presses the fabric down onto the feed dogs for a split second, so the feed dogs operation doesn’t matter. Additionally, as a beginner, I have found that it is better to minimise the required setup and get sewing as quickly as possible.
Tension
There is no need to change your tension. The biggest problems for beginners is loops forming on the back of their work. Loops are caused by a change in pace in your hand movements. For example, sewing loops, rushing around a looping curve and taking your time between them can cause loops to form on the rushed part. Keep the pace of your hand movements even at all times.
Sewing
Starting to sew free motion can be disconcerting. We are used to the machine moving the fabric, and now it is all down to you. The machine should be running at a reasonable pace, but your hands do not need to keep up. If the machine is running too slowly, then your stitches will be long and jagged. Run the machine faster and practise long curvy lines back and forth, snaking up and down your sample piece. Ideally, you would like your stitch length to appear as the length of your regular sewing and all be even. Even stitching comes with practice.
Note : To avoid the bottom thread snagging underneath your work, bring your bottom thread to the top of the sample piece before stitching. To do this, hold the top thread in your left hand. Turn the machine flywheel towards you through a complete revolution to drop the needle in and then back out of the fabric. Once the needle returns to its highest position, pull the top thread in your left hand, and the bottom thread should pop up and can be pulled through and set to the back of the machine.
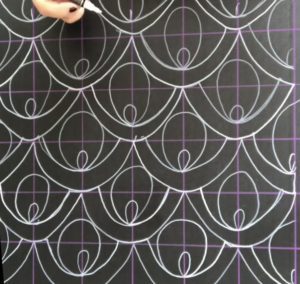
Where Do I Go Next?
The biggest fear in beginners is not knowing where to go. Start with simple designs and move on from there. Below I have demonstrated four simple patterns to get you started. As you sew, try not to allow your shoulders to rise. Keep the distance between your shoulders and ears nice and long to avoid tension building up, which will eventually inhibit your arms’ movement. Concentrate on sewing in the area a hand span distance around you need. If you move out of that area, stop and reposition your hands.

Another great thing to do right from the start is to write with the sewing machine. Start with your name. The movement around writing your name is very familiar and gets your arms moving in lots of new directions.
I’d love to see how you get on… yes, I really would! You can tag me on Instagram or Twitter using #gillymacdesigns or post on my Facebook page.
Once started, I have an online class taken by 100’s of sewist with 80+ doodles for you to practise and learn. Alternatively, find out when my next Zoom Day class here.