
Quilters have been layering and basting quilts for centuries, and as there are lots of different methods. One thing to be clear about is that layering the quilt and temporarily holding it together before sewing, typically referred to as basting, are two different things. There are many ways to layer a quilt; however, the best way to layer a quilt for me is using 505 Temporary Adhesive Spray. If you would prefer not to use an aerosol, I will also show you a pinning method.
Layering a Quilt
Layering a quilt would seem relatively easy. I like to layer quilts on the floor. If you can’t get down to the floor or there isn’t enough room, you may need to do it on a bed or a table. Mattresses are difficult because the fabric doesn’t lay completely flat, and tables are tricky as the quilt will likely be larger than the table.
Over the years, people have developed ingenious ways of laying large quilts in small spaces, often involving pool noodles. If at all possible, I find using the floor much better for me. That said, I have recently been transfixed by a video of a lady completing the whole process on a wall.
Basting the Layers
Again there are lots of methods here. Micro-tags are a recent invention, but I found them hard to remove and sometimes hard to locate once in that quilt. I would recommend avoiding them. Basting by hand is an option. Basting involves sewing long stitches (2-3” long) vertically and horizontally through the layers. This process is time-consuming and not something I think many people will enjoy. Quilting pins are demonstrated below and are an excellent option to avoid aerosols. There is a little more work involved in removing the pins as you sew, disturbing your quilting flow. I quite like the back-to-basics approach to pins. However, my favourite method is using Temporary Adhesive Spray. I use Odif 505 spray. It is removed with the first wash but will hold your layer in place perfectly whilst you quilt without the need to stop and remove pins.
Demonstrations
I demonstrate both methods using a small fat quarter-sized piece of wadding and fabric, but it ultimately represents what I do every time with large quilts. The pink fabric is my quilt top, and the yellow material is the backing.

Pin Method Demonstrated
- Lay to wadding down and secure

2. Lay the quilt backing and pin around the edges to hold together. If it is a larger quilt, put a few pins into the centre. Remember, you will remove these pins shortly, so it is best not to add too many at this point
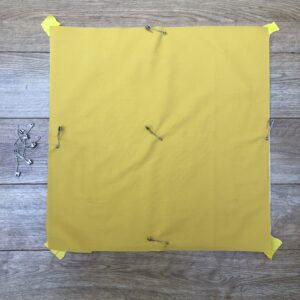
3. Flip over and secure.

4. Lay the quilt top on the wadding and pin all over – leaving 4”-6” between pins. Remove the holding pins from the backing side.

Temporary Spray Glue Method Demonstrated
- Lay to wadding down and secure

2. Lay the quilt top down, flip-up ½ and spray glue to within 1” of the edges.

3. Smooth down the flipped-up side.

4. Flip-up the other half of the quilt top, spray and smooth down.

5. Flip over, secure and repeat the process with the quilt backing.

It is advantageous to have a second person help hold the fabric as you smooth it down after glueing. It makes the process easier as the flipped side can be lowered slowly onto the wadding by one person as the other one simultaneously smoothed out the fabric as it hits the glue.
If you have a big quilt and no helper, then the pool noodle method is the best option for you.
I hope you have found this useful… I’m off to sew up these samples with some quilting practice. 😊
